V2Ray Client Tutorial
A complete step-by-step guide covering installation, subscription import, node connection, and proxy mode setup for Windows / macOS / Linux (v2rayN) and Android (v2rayNG / v2flyNG) — even beginners can get set up in minutes.
Windows: v2rayN Tutorial
A portable app — just extract and run, no installer needed, and uninstalling leaves nothing behind in the registry.
-
Download and extract the installer
Go to the download page to get the latest v2rayN Windows zip file, then right-click and select "Extract All" to any folder (avoid paths with non-English characters or special symbols).
No installation needed: v2rayN is a portable app — just extract and run. To uninstall, simply delete the folder; it won't leave any registry entries behind.
-
What to do about the "unknown publisher" warning on first launch
Double-click v2rayN.exe. If Windows SmartScreen shows "Windows protected your PC," click "More info," then "Run anyway" to continue. This happens because portable apps don't have a paid code-signing certificate — it's expected and unrelated to the software's safety.
-
Open subscription settings and add your subscription link
Click "Subscriptions" → "Subscription Settings" in the top menu bar, click the "+" in the bottom-left to add a new subscription, paste your subscription URL (starting with http/https), then save and close.
-
Update the subscription and choose a node
After closing the subscription settings window, click "Subscriptions" → "Update Subscription" in the toolbar. After a moment, the server list on the main screen will populate automatically. Double-click any node to select it and connect.
-
Set the system proxy mode
Right-click the v2rayN icon in the system tray and choose a mode under "System Proxy": PAC mode (smart, rule-based routing that only proxies the sites that need it — fast), Global mode (routes all traffic through the proxy), or Direct mode (temporarily disables the proxy).
-
Verify it's working
Open a browser and visit any "IP lookup" site to confirm your IP address now shows the proxy node's region — that means it's set up correctly and ready to use.
Tip: If you leave Global mode on long-term, traffic to sites in mainland China will also route through the proxy and may load more slowly — PAC mode is recommended for everyday use.
macOS: v2rayN Tutorial
Be sure to pick the right build for Apple Silicon vs. Intel, and expect a security warning the first time you open it.
-
Download the build that matches your chip
Go to the download page — choose Apple Silicon for M-series Macs, or Intel for older ones. If you're not sure, click the Apple icon in the top-left corner → "About This Mac" and check the "Chip" field.
-
Extract and drag it into Applications
Double-click the downloaded zip to extract v2rayN.app, then drag it into your "Applications" folder to finish installing.
-
What to do about "can't be opened because the developer cannot be verified"
macOS Gatekeeper blocks unsigned apps the first time they're opened. Go to "System Settings" → "Privacy & Security," scroll down to find the notice about v2rayN, and click "Open Anyway" — or hold Control, click the icon in Applications, choose "Open," and confirm once more.
This warning appears once for any unsigned app the first time it's opened. After allowing it once, you can open it normally by double-clicking from then on.
-
Import your subscription and connect to a node
The process is identical to Windows: "Subscriptions" → "Subscription Settings" in the menu bar to add your link → update the subscription → double-click a node to connect.
-
Grant system proxy / network permissions
The first time you enable the system proxy or TUN mode, macOS will show a network permission prompt — click "Allow." This is a standard system-level security check.
If the menu bar icon disappears, reopen v2rayN from Launchpad — it will reappear in the menu bar without showing the prompt again.
Linux: v2rayN Tutorial
Uses the same cross-platform client as macOS. It involves a bit more command-line work, but the configuration logic is identical.
-
Download the package
Go to the download page and pick the package for your distro: .deb for Debian / Ubuntu, .rpm for Fedora / RHEL, choosing the x64 or ARM64 build for your CPU.
-
Install and launch
On Debian / Ubuntu, run
sudo dpkg -i v2rayN_*.debin the terminal; on Fedora / RHEL, runsudo rpm -i v2rayN_*.rpm. Once installed, find v2rayN in your app menu, or launch it by typingv2rayNin a terminal. -
What to do about missing dependencies
If the .deb install reports missing dependencies, run
sudo apt --fix-broken installto resolve them automatically. For .rpm installs, usednf installoryum installbased on the error message to add the missing library. -
Import your subscription and connect to a node
The process matches Windows/macOS: add your link under "Subscriptions" in the menu bar → update the subscription → double-click a node to connect.
-
Set up the system proxy or TUN mode
In most desktop environments (GNOME, KDE, etc.) you can manually enter v2rayN's local listening port under "Network Proxy" in system settings, or simply enable TUN mode inside v2rayN to let it take over all traffic without touching your system proxy settings.
For headless servers with no desktop environment, it's better to run the Xray/V2Ray core directly with a config file rather than using a GUI client.
Android: v2rayNG / v2flyNG Tutorial
Both clients work almost identically — the steps below apply to either.
-
Download and install the APK
Download either the v2rayNG or v2flyNG APK from the download page. If your system prompts "Allow installation from unknown sources" during install, tap Allow to continue.
-
Add your subscription link
Open the app, tap the menu icon in the top-right → "Subscription Groups" → the "+" in the top-right → paste your subscription link and save.
-
Update the subscription to fetch nodes
Back on the main screen, pull down to refresh or tap "Update Subscription" in the menu. The node list will populate automatically after a moment.
-
Run a speed test and pick a node
Tap the speed test icon in the top-right to test the latency of all nodes at once, then choose the one with the lowest latency (usually shown in green) by tapping it.
-
Connect the VPN
Tap the round connect button in the bottom-right. On first connection, a "VPN connection request" dialog will appear — tap "OK" to grant permission and start connecting.
-
Choose a proxy mode
In settings, you can switch between VPN mode (default, routes all phone traffic) or Proxy-only mode (only exposes a local proxy port — more compatible, but some apps won't route through it automatically).
Tip: On some phones (especially with custom Android skins), battery-saving or background app management can kill the background service and disconnect you. Add the app to the battery optimization whitelist and allow auto-start in system settings.
How Do You Import a Subscription Link?
Whether you're using v2rayN or v2rayNG / v2flyNG, importing a subscription works largely the same way. There are three common methods.
Method 1: Paste a subscription URL (most common)
Add a new subscription in the client's "Subscription Settings," paste a URL starting with http/https, and save. Then click "Update Subscription" to automatically fetch all nodes — you can also set an auto-update interval afterward.
Method 2: Scan a subscription QR code
Mobile clients like v2rayNG / v2flyNG have a built-in QR scanner. If your subscription provider gave you a QR code, just choose "Scan QR Code to Import" in the app and point your camera at it — no need to type the link manually.
Method 3: Manually add a single node
If you have a single share link (starting with vmess://, vless://, ss://, trojan://, etc.), copy it to your clipboard, then choose "Import from Clipboard" in the client to add that one node — handy if you only have a few nodes.
Note: This site doesn't provide or sell any subscription links or node information — we only offer client downloads and usage tutorials. You'll need to obtain your own subscription link (for example, from a trusted provider, or by running your own server). To learn how subscription links work under the hood, check out this explainer article.
Which Proxy Mode Should You Choose?
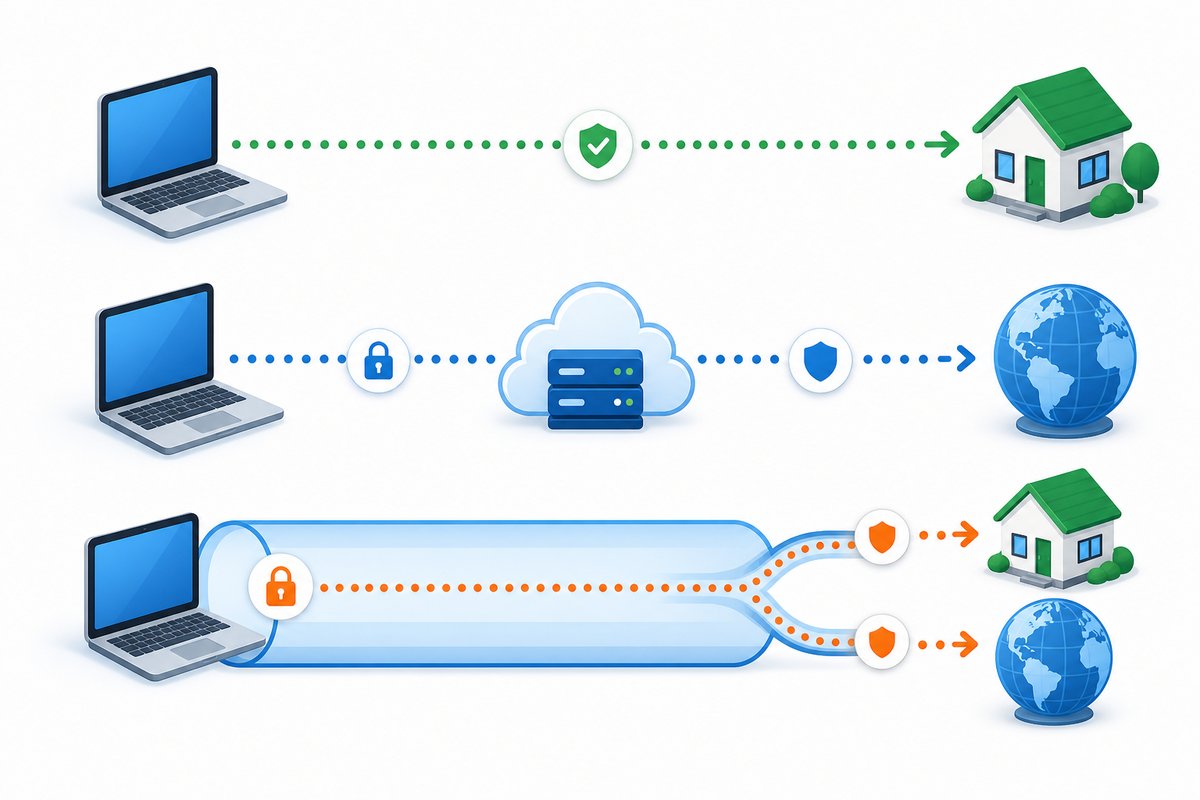
Naming varies slightly between clients, but the underlying logic is the same — use the diagram below to pick the right mode for your situation.
PAC ModeRecommended default
Smart, rule-based routing that only proxies the sites you need to bypass restrictions for, while sites in mainland China connect directly — fast, and won't affect access to services based there.
Global Mode
Forces all network traffic through the proxy node, with no distinction between mainland China and international sites. Useful for temporarily forcing an app that doesn't support rule-based routing to use the proxy.
TUN Mode
Intercepts all traffic at the system network layer, then splits it into direct or proxied paths by rule. It doesn't rely on app-level system proxy settings, offers the best compatibility, and works well for games and command-line tools.
Direct / Bypass LAN and Mainland China
Barely uses the proxy at all — only attempts it outside of LAN/mainland China addresses. Useful for temporarily disabling the proxy or troubleshooting network issues.
Advanced Settings: Routing Rules & DNS
The default settings work fine out of the box, but understanding these options can make your connection faster and save data. We'll use v2rayN as an example — the setting names in v2rayNG / v2flyNG are nearly identical.
Custom routing rules
Under "Routing" → "Custom Rules," you can add domain/IP rules to force certain sites to always connect directly (like internal networks or services based in mainland China) or always go through the proxy — these take priority over the default PAC logic, which is handy if you have special requirements for specific sites. If you're not familiar with the concept of routing rules, check the glossary first.
Predefined rule sets (Geosite / Geoip)
The client ships with community-maintained geosite/geoip rule sets covering major mainland Chinese sites and IP ranges — PAC mode's smart routing is based on these rules by default. You generally don't need to maintain them manually; just keep the client updated and the rule sets update along with it.
Smart DNS routing
Under "Parameter Settings" → "DNS Settings," you can assign separate DNS servers for mainland Chinese and international domains, which helps avoid DNS leaks and reduces handshake failures and occasional blank pages.
Local listening ports (HTTP / SOCKS)
"Parameter Settings" lets you view and change the local HTTP/SOCKS listening port numbers. Other software that needs its own proxy configuration (like download managers or command-line tools) can point to this port to reuse the same proxy without configuring it separately.
Multi-Node Management & Speed Testing
A subscription often includes dozens of nodes — making good use of grouping and speed testing can noticeably improve your day-to-day experience.
Manage nodes by subscription group
If you've added multiple subscriptions, the client automatically groups nodes by source, making it easy to tell them apart. You can also temporarily "disable" groups you rarely use to cut down on the number of nodes tested each time.
Latency test vs. real connection test
A "latency test" (Ping/TCPing) only measures network latency to the server — it's fast, but doesn't guarantee you can actually reach overseas sites. A "real connection test" actually requests a test URL through the node — it takes longer but is more reliable. If something's not connecting properly, check the real connection test results first.
Sort by latency / auto-select the best node
After testing, click the "Latency" column to sort and quickly find the best node. Some versions also support an "auto-select fastest node" policy group, which automatically switches your connected node based on test results — no manual picking needed.
Clean up dead nodes
Over time, your subscription may accumulate old nodes that are no longer active. In subscription settings, choose "Keep enabled nodes only" or re-fetch the subscription to overwrite the old list, keeping things tidy and speed tests faster.
Common Troubleshooting
Can't connect, or the connection is slow? Work through the checks below in order — most issues can be resolved on your own.
Check whether your subscription has expired
If your subscription is a paid service with an expiration date, confirm it hasn't expired — expired subscriptions typically can't fetch valid nodes, or none of the nodes will connect.
Manually update the subscription
Tap "Update Subscription" in the client to fetch the latest node list, so you're not stuck using an outdated node.
Run a speed test and switch nodes
Use the client's built-in latency test to pick a node with low latency and a healthy test result — occasional instability on a single node is normal.
Confirm the proxy mode is set correctly
Check whether you're currently on PAC, Global, or TUN mode, and make sure it hasn't accidentally been set to "Direct" or had the system proxy turned off.
Check your local network environment
Try switching between Wi-Fi and mobile data to rule out local network restrictions or router settings as the cause.
Still not working?
Check the FAQ page for more answers, confirm you're on the latest client version via the download page, or see if you've run into any of these common beginner mistakes.
Haven't downloaded the client yet?
Download the client for your platform first, then follow the steps above — you'll be up and running in just a few minutes.